
The most powerful property that containers posses is, in my opinion, their ability to share mount points. To explain this, we will need to talk a bit about the technical details of the LXC engine.
Containerss, generally, all share the same kernel as each other and the host. This is what distinguishes containerization (be it LXC, Docker, or other forms of containerization) from virtualization. while virtual machines offer the benefit of complete isolation, they introduce performance overheads, and are a bit cumbersome to deal with because of said isolation.
Containers on the other hand can share resources with each other and the host, thanks to their shared kernel. Most notably, this allows us to share the GPU, as well as set up shared mount points.
As an example, say you have a bunch of containers where you set up SQL servers on, and you regularly need to backup a database and restore it on another server. instead of going through the hassle of doing pct pull then pct push, you can create a folder, say, /mnt/sql, and then set up mount points in each container that all point to that folder.
That way, each container has access to /mnt/sql, and all the files in it. Each container can move/copy files in and out. You can also set up a separate container and set up a Samba share on it, so you too have access to all these files from you laptop, PC, phone, etc.
This guide will walk you through how to do that, and will be split into to sections: configuration on the Proxmox node, and configuration inside the containers.
User mapping explained
Before delving into the steps of setting up the mount points, let’s quickly go over the theory of how any of this is possible, and it’s split into to parts: the resource (i.e. mount point) binding, and the user mapping.
The mount point binding is easy enough to explain: you’re telling Proxmox “I want this directory that’s inside the container to directly point to the directory on the host node.”, easy enough.
As for the user mapping, i want to go over the default behavior of the LXC engine.
You may have noticed an option when creating containers called privilege. Under the hood, what that option does is simple: disable user mapping. See, inside a privileged container, any user has it’s user ID (UID) and group ID (GID) mirrored exactly on the host node as they are in the container.
For example: all Linux distros has the root user’s UID as 0. So the root user in a privileged container is acting as the Proxmox node’s root user, since it’s UID is 0, both inside the container and in the Proxmox node. This obviously poses a massive security issue, and why i don’t have any privileged containers, at home or at work.
Unprivileged containers, on the other hand, map users to different UIDs and GIDs, so while inside the container, the root user’s UID appears as 0, in the Proxmox node it’s actually an entirely different UID, i most cases 100000. That way it doesn’t pose nearly as big of a security threat.
Host node Configuration
Setting up users
The first thing we will need to do is set up the users and permissions responsible for the directories on the host node, and that is split into four segments:
Setting up root’s permissions to map users
This segment explains the crux of the entire guide:
The trick to this whole thing is that we will exclude certain UIDs and GIDs in the containers from being mapped to useless counterparts on the host, and instead mirror them directly. Then, on the host node, these UIDs and GIDs correspond to users who have ownership over the shared directories.
The first step to do that is editing /etc/subuid and /etc/subgid. By default, both will look like this:
root:100000:65535The above line is translated to “root is allowed to map users to an ID range that is 65535 long, and that range starts at 100000”. So, effectively, root is allowed to mirror UIDs and GIDs in the containers to the range: 100000-165535.
We will edit both the subuid and subgid files and add the following lines. you can edit them to suit your needs:
root:1000:10The above line gives root explicit permission to map IDs inside containers to the 1000-1010 range.
The first step is done; we gave root permission to map IDs to a different range.
UID / GID 0 -> root UID / GID 65534 -> nobody
Creating the users on the host node
So, root can map UIDs and GIDs to the 1000-1010 range. Now, We create users on the host node with UIDs and GIDs inside that range.
Make sure to edit the following lines to fit your setup, and that the IDs are within the range we configured in subuid and subgid.
groupadd -g <GID> <NAME>
useradd -g <GID> -u <UID> <NAME>
Repeat the above lines as you wish to create as many groups and users as you need.
Creating the directories and configuring their permissions
Now that our users are setup, we need to create the directories that will act as the shared mount points, and configure their permissions so that our users can utilize them.
Pay attention that the UIDs and GIDs are configured correctly.
mkdir -p <PATH>
chown <UID>:<GID> <PATH>
chmod <PERMISSIONS> <PATH>
You can also create as many directories as you want.
One thing of note in the above commands is the <PERMISSIONS> parameter. personally, I set them up as 760 most of the time, but feel free to customize them as you see fit, but please revert from using 777 for the love of god.
Configuring the containers
Now the last thing we need to do on the host node is edit the .conf files of the containers and add the mount points and user mapping configurations.
nano /etc/pve/lxc/<CTID>.confAdding the mount point configuration is easy enough, just add this line for each mount point you want to add:
mp<NUMBER>: <PATH ON HOST>,<PATH IN CONTAINER>As for the user mapping, we need to delve into some explanation:
Like we said, by default, root is allowed to map users in containers in the range 100000-165535. in the .conf file, we are going to “interrupt” this mapping and tell him (for example) “instead of mapping the ID 1001 to 101001, mirror it to directly to 1001”.
you will add 6 lines in total, three for UIDs, and three for GIDs.
lxc.idmap: u 0 100000 1000
lxc.idmap: u 1000 1000 1
lxc.idmap: u 1001 101001 64535
lxc.idmap: g 0 100000 1000
lxc.idmap: g 1000 1000 1
lxc.idmap: g 1001 101001 64535Both are basically the same, the difference is that one (u) maps UIDs, the other (g) maps GIDs, and their format is like this:
lxc.idmap: <u OR g> <CONTAINER RANGE START> <HOST RANGE START> <RANGE LENGTH>These three lines are all basically mapping ranges. Now as we’ve discussed, root maps IDs in a range that’s 65535 long. when you modify this range, you must make sure it still maps a range that is the same length.
so the three lines are translated as follows:
-
lxc.idmap: u 0 100000 1000translates to “map the ID range that starts from0and is1000long to an ID range that is1000long but starts from100000.” -
lxc.idmap: u 1000 1000 1translates to “map the ID range that starts from1000and is 1 ID long to an ID range that also starts from1000and is 1 ID long. -
lxc.idmap: u 1001 101001 64535translates to “Complete mapping the rest of the mapping range, continuing from1001to the rest of the range and map it, starting from101002”.
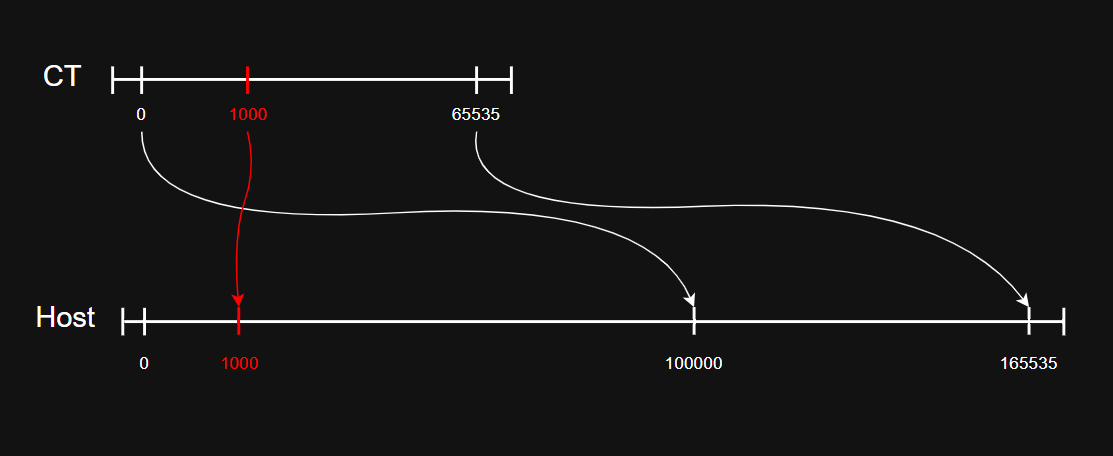
So as you can see, you need to map a range whose length is 65535. By default, it’s configuration is lxc.idmap: g 0 100000 65535, mapping the container’s 0-65535 range to 100000-165535. What we did is split that range into 3 parts: 0-999 is mapped as normal to 100000-100999, but 1000 is mapped directly to 1000, and then 1001-65535 is mapped as normal to 101001-165535.
If you do this and the container doesn’t start, you most likely did the math wrong; you must map the entire 65535 range length.
With that, all the work on the Host side is done, we only have a few things to do on the container side.
Container configuration
We only need to do things on the container side: configure the users to utilize the mapped IDs, and make sure the ownership and permissions of the mount points are correct.
User configuration
Note: i use adduser and addgroup here to account for alpine, if you’re on an ubuntu container, use useradd and groupadd instead.
addgroup -g <MAPPED GID> <USERNAME>
adduser -u <MAPPED UID> -g <MAPPED GID> <USERNAME>
Directory configuration
This step isn’t necessary, it’s just to make sure ownership and permissions are correct.
chown <UID>:<GID>  <PATH>
chown <PERMISSIONS> <PATH>
And with that, your mount points are configured!
Hope this guide was helpful, i have similar guides to this concerning both GPU mapping and passthrough (they are mutually exclusive), as well as other guides, so make sure to check them out!